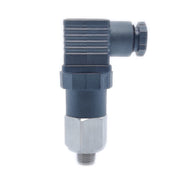
Introduction: Attention Arduino enthusiasts and tech aficionados: we have a game-changer for you! Introducing XIDIBEI, a brand known for its high-quality, precise, and versatile pressure sensors. If you're looking to enhance your Arduino projects with accurate and reliable pressure sensing, XIDIBEI has the perfect solution for you. Let's dive in and discover the world of opportunities that XIDIBEI pressure sensors bring to your creations.
XIDIBEI Pressure Sensors: A World of Possibilities XIDIBEI is a brand that has made a name for itself in the world of pressure sensing. Their pressure sensors are suitable for a wide range of applications, from weather monitoring to water level measurement and even aerospace and automotive industries. The compact design and low power consumption of XIDIBEI pressure sensors make them an excellent choice for IoT devices and battery-powered applications.
Effortless Arduino Integration XIDIBEI pressure sensors are designed with Arduino users in mind. Their seamless compatibility with Arduino boards ensures that you can quickly and easily integrate them into your projects. With an extensive library of resources and a supportive community, you'll be up and running with your XIDIBEI pressure sensor in no time, regardless of your experience level.
Step-by-Step Guide to Setting Up Your XIDIBEI Pressure Sensor with Arduino
-
Gather your materials: To get started, you'll need an Arduino board (Uno, Mega, or any other compatible board), a XIDIBEI pressure sensor, a breadboard, jumper wires, and a micro-USB cable to connect your Arduino to your computer.
-
Wire the sensor: Connect the XIDIBEI pressure sensor to your breadboard using jumper wires. Ensure that the VCC pin is connected to the appropriate voltage pin on the Arduino board (usually 3.3V or 5V), GND to GND, SDA to A4 (for Uno) or SDA (for Mega), and SCL to A5 (for Uno) or SCL (for Mega).
-
Download and install the library: Open the Arduino IDE and download the XIDIBEI pressure sensor library. Install the library and restart the IDE.
-
Load the example sketch: In the Arduino IDE, navigate to File > Examples > XIDIBEI_PressureSensor. Load the example sketch to your Arduino board.
-
Monitor your pressure readings: Open the Serial Monitor in the Arduino IDE (Ctrl+Shift+M). You should now see real-time pressure readings displayed on your screen.
-
Customize your code: With the XIDIBEI pressure sensor successfully integrated into your Arduino project, you can now customize the code to fit your specific needs, whether it's tracking atmospheric pressure, water levels, or any other application.
Conclusion: XIDIBEI pressure sensors are a must-have for Arduino enthusiasts who value precision, versatility, and ease of integration. With their accurate measurements, compact design, and seamless compatibility with Arduino, XIDIBEI sensors will take your projects to new heights. Don't wait any longer; explore the incredible world of possibilities with XIDIBEI pressure sensors and unlock the full potential of your Arduino projects!


Leave a comment